This tutorial will show you how to set up a JetHost PRO email account in Thunderbird
We will be using a test email account email@yourdomain.com. Of course, you will have your own email address so substitute that in the appropriate places.
NOTE: Before proceeding, make sure you have a mailbox created.
1. Go to File > New > Existing Mail Account: 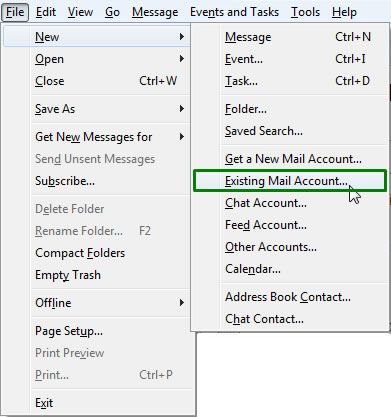
2. In Mail Account Setup window enter the following details:
Your Name: the name you would like the recipients of your emails to see
E-Mail Address: your full email address
Password: your email account password
Make sure you do not have blank spaces in it.
3. Once all the fields are filled, click Continue: 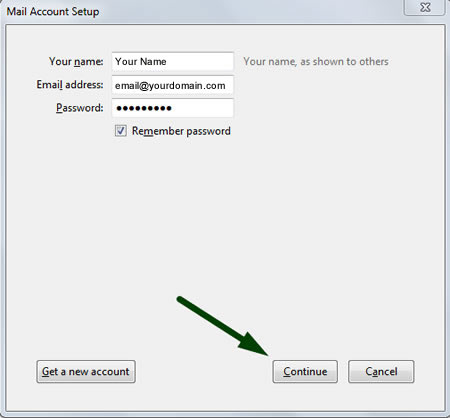
4. You will see Configuration found at email provider message.
Make sure that your Incoming and Outgoing configuration was detected properly and matches the one you can see on the screenshot below: 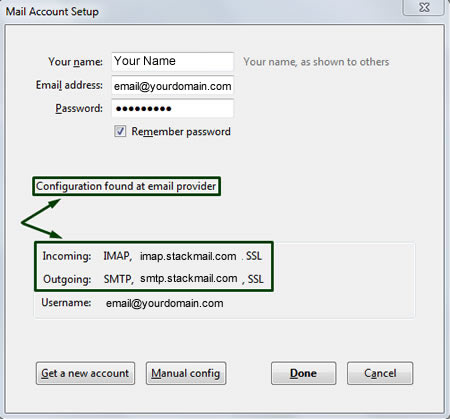
Click Done if it is the same. You're Done!
If your email account is not added automatically using the above steps, you can complete the first two steps and continue configuring Thunderbird manually in this way:
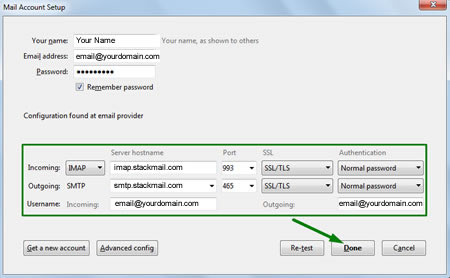
1. After the first two steps are completed you will either see manual config window (in case Thunderbird fails to detect configuration automatically) or will need to click on Manual Config to see that window: 
2. In the next screen, select POP3 or IMAP from the Account Type list, and enter your details as follows:
For IMAP protocol use the following settings:
Incoming server: imap.stackmail.com - POP3 Port: 993 SSL: SSL/TLS Authentication: Normal Password
Outgoing server: smtp.stackmail.com - SMTP Port: 465 SSL: SSL/TLS Authentication: Normal Password
For POP3 protocol use the following settings:
Incoming server: pop3.stackmail.com - POP3 Port: 995 SSL: SSL/TLS Authentication: Normal Password
Outgoing server: smtp.stackmail.com - SMTP Port: 465 SSL: SSL/TLS Authentication: Normal Password 
Advanced Settings
Once your account has been created, you will be able to choose additional settings for IMAP or POP3 incoming/outgoing server.
1. Right-Click on your account in the list of accounts: 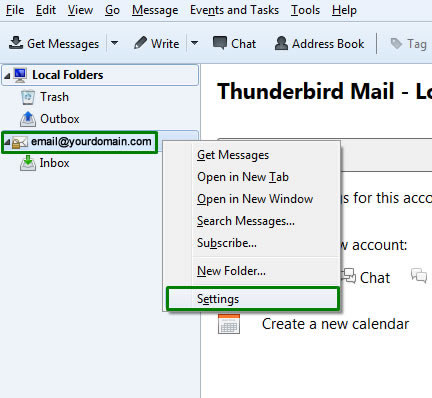
2. To manage incoming server, go to Server Settings: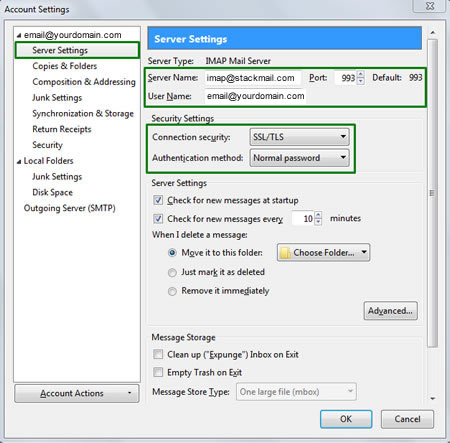
3. If you need to change settings for outgoing server, select Outgoing Server (SMTP):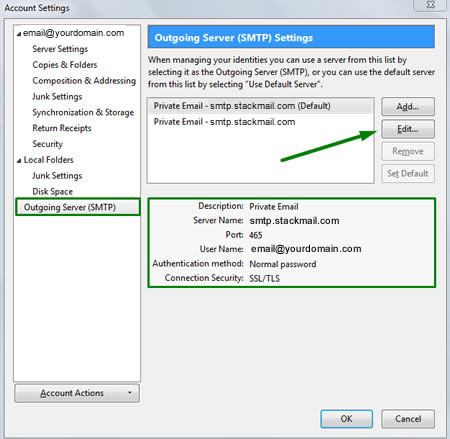
Here you can find your current settings for accounts you have and click on Edit… to make changes in the next window: 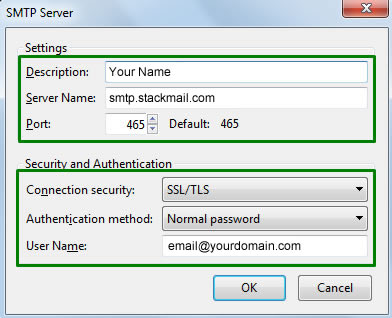
That's it!